
Click here for the PDF.
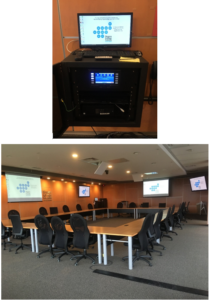
About the Room
- Three TV’s spaced throughout the room
- There are two projectors
- There are eight hanging microphones
- Everyone has access to power
- The light switches are by the door
To start your presentation
Start by turning on all the displays you want to use. (Televisions and projectors)
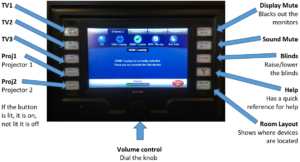
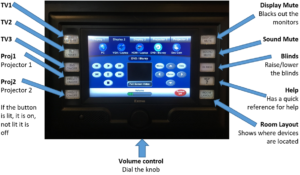
To power on the devices, you press the appropriate button on the left of your display. When they are turned on, they will light up.
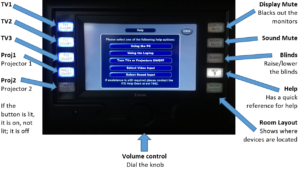
The controls for the touchscreen
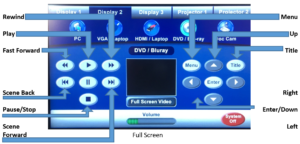
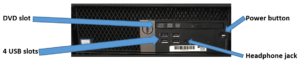
PC
- Select your Display/Projector
- Display 1, Display 2, Display 3, Projector 1, Projector 2
- Then select your input for that Display/Projector
- PC, VGA/Laptop, HDMI/Laptop, DVD/Blu-ray, Doc Cam
When the PC menu is selected, the display will reflect what you have chosen for your output
Duplicate – Shows your desktop on the projector
Extend – uses the projector/TVs as a second monitor (landscape view)
Second Screen only – Displays only on the projector, not the podium
You can quickly switch through views with Win + P on the keyboard
You can also change the Monitor/Projector displays by:
- Right-click on the Desktop
- Select Display Settings
- Choose the desired display
- Select Keep Display or Revert
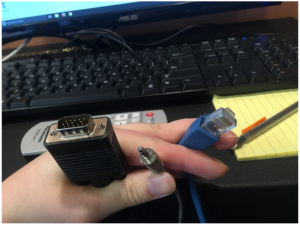
VGA/Laptop
- Select your Display/Projector
- Display 1, Display 2, Display 3, Projector 1, Projector 2
- Then select your input for that Display/Projector
- PC, VGA/Laptop, HDMI/Laptop, DVD/Blu-ray, Doc Cam
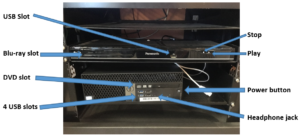
There are connections below the unit. Make sure you plug into the Ethernet (internet) directly and use the audio jack if you are displaying videos. Make sure the VGA/Laptop input is selected to display your connected device
HDMI/Laptop
- Select your Display/Projector
- Display 1, Display 2, Display 3, Projector 1, Projector 2
- Then select your input for that Display/Projector
- PC, VGA/Laptop, HDMI/Laptop, DVD/Blu-ray, Doc Cam
There is an HDMI cable below the unit, make sure to select the HDMI input to display your screen
DVD/Blu-ray
- Select your Display/Projector
- Display 1, Display 2, Display 3, Projector 1, Projector 2
- Then select your input for that Display/Projector
- PC, VGA/Laptop, HDMI/Laptop, DVD/Blu-ray, Doc Cam
You can use the remote, which should be on top of the podium.
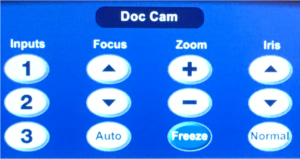
Doc Cam
(There is no doc cam set up in this room, but it can have one set up)
- Select your Display/Projector
- Display 1, Display 2, Display 3, Projector 1, Projector 2
- Then select your input for that Display/Projector
- PC, VGA/Laptop, HDMI/Laptop, DVD/Blu-ray, Doc Cam

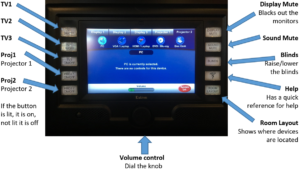
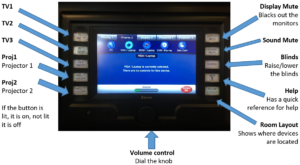
Blinds button
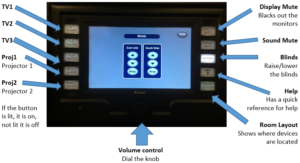
Help Button
| Using this PC
1. Turn on the computer by pressing the ON button at the top left corner of the computer. 2. To turn TVs or Projectors ON please check the Turn TVs or Projectors ON/OFF help page. 3. To select video input please check the Select Video Input help page. 4. To select sound input check the Select Sound Input help page. 5. If you do not have a user name to log in, you can use the following:
If assistance is still required please contact the ITS Help Desk at ext 7642 |
| Using the Laptop
1. Plug the VGA or HDMI cable and sound cable to your laptop 2. To turn TVs or Projectors ON please check the Turn TVs or Projectors ON/OFF help page. 3. To select video input please check the Select Video Input help page. 4. To select sound input check the Select Sound Input help page.
If assistance is still required please contact the ITS Help Desk at ext 7642 |
| Power ON/OFF TVs and Projectors
1. Use the buttons located on the left-hand side to power the TVs and/or projectors. 2. When the display is ON, the button light is blue, when it
If assistance is still required please contact the ITS Help Desk at ext 7642 |
| Select Video Input
1. Choose which display you want to use by selecting one of the display buttons located at the top of the screen. 2. Select one of the input buttons labelled PC, VGA/Laptop, HDMI/Laptop, DVD/Blu-ray or Doc cam located under the display buttons. 3. You can select different video input for each display
If assistance is still required please contact the ITS Help Desk at ext 7642 |
| Select Sound Input
1. Select the button labelled “Audio Source”. 2. From the popup window, select the sound source by selecting one of the three buttons labelled PC, AUX/Laptop or DVD/Blu-ray.
If assistance is still required please contact the ITS Help Desk at ext 7642 |
The controls for the unit below
Join or invite for a Conference
- Its best if you add whom you will be conferencing with to your contacts list
- If you have multiple people who are not in your contacts, it will become confusing as they are displayed as guests
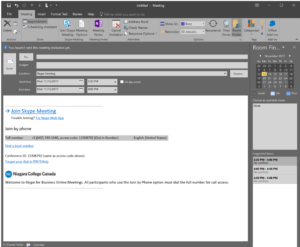
Requesting a Skype Meeting (conference)
- Log into Skype for Business
- Locate the contact you wish to meet with
- Right click the contact and Select Schedule a Meeting
- Fill out the Subject, Location, any other information
- Click Send
Accepting a Meeting
- Log into Outlook
- Open the Meeting Request
- Accept the Meeting Request
- Click Join Skype Meeting
- Select the preferred option for chatting
- You are now connected
Coming soon
Individual Toll-Free numbers for a better conference experience.
Click here for the PDF.